
Launch Error
How to Solve "Failure to initialize" Error on Android Emulator
2019-09-25
It's very common and safe to use an Android emulator to emulate the Android OS on our Windows operating system. But sometimes, we may got "Failure to initialize" error message when launching some mobile games or apps on PC using emulators. We can't open the app successfully and it says "Your hardware does not support this application."

What Causes Failure to Initialize Application Error?
The "Failure to initialize" error may be caused by the incompatibility between the Android emulator and your out-of-date AMD CPU. If your CPU processor comes from AMD Phenom and AMD Athlon series, there might be a great chance to trigger the incompatibility error. In other words, the error won't happen if you are using Intel CPU or some new AMD CPU.
Usually, most incompatibility issues will be fixed automatically when LDPlayer team notices the problems and updates the emulator online. However, there may be omission of immediate reports from emulator users so that LDPlayer team can't deal with the error instantly. As a result, you can report the error to LDPlayer staff through Facebook first and solve the problem by yourself following a few simple steps below.
How to Easily Fix Failure to Initialize Error on Android Emulator?
So, if you've got "Failure to initialize" error launching a specific app/game on LDPlayer, then we strongly recommend that you try the following methods to fix the incompatibility problem. There are two tried and tested ways that can successfully solve the "Failure to initialize" error.
The Ultimate Way to Fix the Incompatibility Issue
In the following, we will teach you how to adjust your emulator to be compatible with the app/game you play on LDPlayer. Please be aware that this won't damage your CPU and the emulator. You can consider this as an improvement for your LDPlayer instance.
STEP 1: Open your emulator settings and enable Root Permission on the basic tab
STEP 2: Access the File Manager from System Apps and head to the settings too
STEP 3: Click General settings and find the Access mode
STEP 4: Switch to Root Access mode and go back to the root folder
STEP 5: Click data folder first and then enter app folder
STEP 6 : Find and remember the package name of the incompatible app/game (without “-” and the number)
STEP 7: Go back to the root folder: Enter the etc folder and find the app_arch_list file
STEP 8: Long click the file and choose Open with editor
STEP 9: Type in the package name of your app/game and add “armeabi-v7a” next
STEP 10: Delete the app/game and reinstall it from LD Store
You might wonder: Most Android emulators in the market including LDPlayer are using x86 architecture, which is a family of instruction set architectures initially developed by Intel. So if you're using Intel CPU, you will have an awesome compatibility and smooth performance. But in order to solve the incompatibility issue with AMD CPU, we need to run the incompatible app in the form of armeabi-v7a architecture first. You can find more details on Google if you’re interested.
The Alternative Method to Solve Failure to Initialize
Instead of adjusting the emulator, you can also modify the APK to bypass the incompatibility error. It's easier to fix the error in this way. However, this might not work with all Android apps/games because some of them will crash on LDPlayer if the APK files get modified. So this is just an alternative method for you to solve the "Failure to initialize" error.
Get the APK File on Your Desktop First
If you install the app/game through individual APK file, then you can modify that APK file which is already on your desktop. If you download the app/game from LD Store, then you need to follow these steps to extract the APK file from LDPlayer to your desktop.
STEP 1: Open File Manager >> data >> app
STEP 2: Find and click the app/game folder you want
STEP 3: Select the APK file (When you select the file, the APK will be copied)
STEP 4: Open Share Folder (Ctrl + 5) from the toolbar
STEP 5: Click Android shared folder
STEP 6: Click "three-dots" menu on the upper right side and choose "Copy selection here"
STEP 7: Open Share Folder again and click PC shared folder
STEP 8: Now the APK file is transferred to your computer.
Or, you can skip those steps and download a new APK file from Apkpure or other resources.
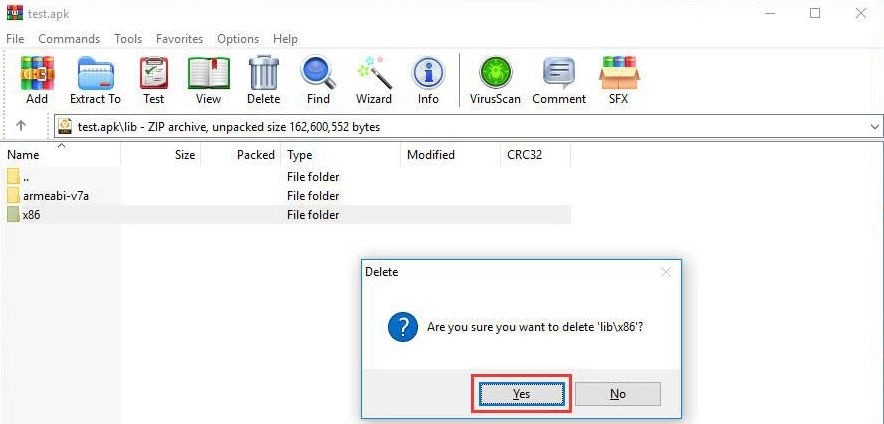
Modify the APK File by Deleting the x86 Folder
STEP 1: Right click the APK file and open with a File Archiver
STEP 2: Find a folder named "lib" and open it
STEP 3: Delete the x86 folder and you are done modifying the APK
Reinstall the App/Game
STEP 1: Drag-drop the modified APK file on LDPlayer and it will start installing
STEP 2: Wait for a while and launch the app/game
How Does It Work?
The above methods should troubleshoot the "Failure to initialize" problem on your Android emulator. This is the end of this post and if unfortunately, the error still exists after you did the troubleshooting, please report your issue and get help from our Facebook staff.
You might also like: Top 5 Ways to Fix Lags in Android Emulator