


Punishing: Gray Raven – Everything You Need To Know About Difficult Bosses
2021-07-23
Punishing Gray Raven is an Action RPG game with many different Structures and Ravens, each with unique playstyles that you can play within the game. The game offers you many options to test these Heroes out against dominating Bosses, which you can only defeat if you are familiar with the Orbs and Supercomputing Space mechanics in the game. While on the exterior, it may seem like another combo-based Action game, but it has many more Combat mechanics that have set a new stage in mobile gaming that was a forte of console gaming before.
In this guide, we have compiled a list of the 9 most essential and difficult fights in Punishing: Gray Raven that you must need to learn to fight beforehand. The compilation is based on difficulty, coolness, roadblocks, and the game's top-presented Bosses. Some of the Bosses have already made an appearance in our Pain Cage Guide as the Game Mode's difficult bosses, so we didn't include them in the list. For more in-depth information on Punishing: Gray Raven, please read our Guides on the game.
Punishing Gray Raven - Bosses:
The following are the bosses in Punishing Gray Raven:
Nozzle:
Nozzle has a relatively simple move set design as he only has four moves that he can perform. Typically, he opens the fight with an ice grenade when you're mid-range from him, which can slow you down from the ice field it erupts. He can leap from a distance towards your location, which is easy to anticipate and dodge. Up-close, he has only two melee attacks. A stomp and a swipe attack, both of which are heavily telegraphed. And that is it for his encounter in the story, pretty simple and just a little bit of practice.
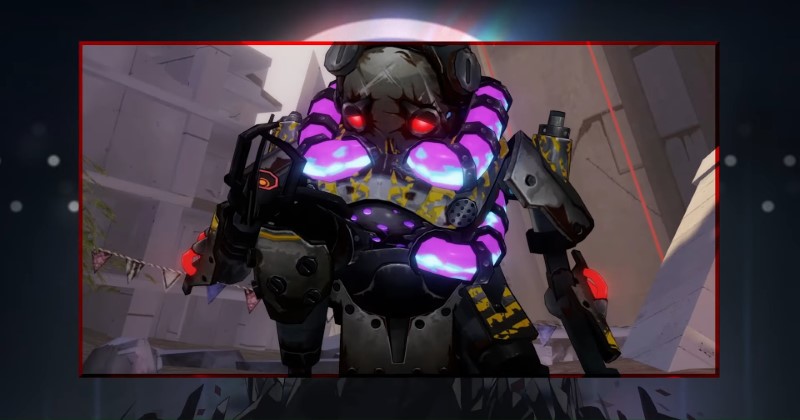
On higher difficulties, he gets two extra moves after a certain HP threshold. One of them being ice spray which slows you if you move on it, while the other being summoning five deadly jitterbugs who self-destruct while nearby, and that's it for the Boss Nozzle.
Iron Maiden Tifa:
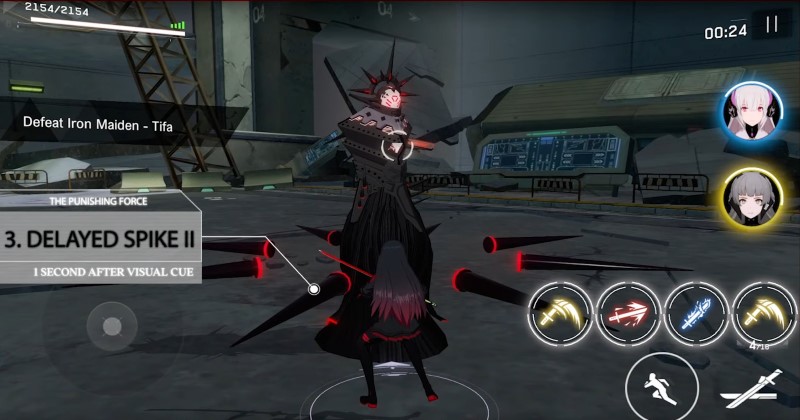
Iron Maiden Tifa’s attacks have a certain rhythm to them once you understand how it works. You can apply the strategy to most of her attacks. As soon as the battle begins, she'll open up with an attack in which spikes will emerge from your last location. The timing to dodge them is 1 second after the Telegraph. Knowing the telegraphs, the fight will become trivial. When she removes her headgear, she'll start to fire slow non-homing projectiles at your location. Just dodge or run, and you can evade the attacks. The same is the case with her other Spike Attacks. That’s all there is to Phase 1 of Tifa.
As her health goes low, phase two begins. She has only two attacks in this phase, so it's straightforward. She does the same delayed spike again from the grounds, but this time she'll do it 2 to 4 times in a row on your location. The timing is still the same. Tifa will then hurl projectiles at your location for her next attack. Her attack pattern only alternates between these two moves in this phase—the attacks as mentioned above complete the move set for the regular Tifa Boss fight.
At higher difficulties, Tifa has three new attacks in her second phase; however, all three attacks follow the same rule with delayed dodge. If you get caught by the spiked cage, you'll have to break out of it with attacks while Tifa starts hurling projectiles at you. A forward spike is moving towards you in a line, nothing complicated, 1-sec delay as usual. And finally, a scream AoE attack; this usually only happens when you’re in melee range.
Roland:
Roland, Ascendant Boss, has a slightly unique mechanic involving his slashes, but we will dive in and break down his move set to simplify the fight as usual. The battle opens with Phase 1 of the battle. Roland fires a single shot with his rifle; you should have no trouble dodging it. Roland has four different melee attacks, each with varying windups if you choose to fight him up close. Roland will raise his blade over his shoulder with a slight windup for one of the attacks, and you can expect a forward slash from him. This move has a slight delay, and unsuspecting players would get baited to dodge.
For the second of his possible attacks, Roland would spring around and perform a quick kick. The second attack has the shortest Telegraph and is also the deadliest. It starts with a hit, and following strikes are usually fatal if you get caught by it, so you need to react fast enough. For his 3rd possible move, Roland will rest his blade on his shoulders as he taunts you followed up with two forward and a downward slash. These attacks are easy to avoid.
Unlike most bosses, Roland’s second phase only lasts for a while before returning to the standard phase; the same goes for the 3rd phase. When the phase begins, Roland will jump in a particular direction and has four different moves. Rolland will summon pillars at your location while not in melee range, which will launch you up, which is telegraphed, followed by his combo. However, just like his kick attack, a quick character switch and dodge can break you out of his combo. When Roland starts twirling his sword in front of him, he’s readying for a three-wide AoE combo with his weapon.
Twirling attack is easier to dodge when you’re at melee range where you could get behind him. The same goes for his 2nd twirl; all you need to do is dodge to the sides. And lastly, a forward-wide AoE 2-hit sword combo. That’s the end of Phase 2 which only lasts about half a minute, and Roland will revert to his standard phase.
In harder difficulty, Roland adds two more attacks. The first one being where he swings across the map with countless explosions counter by running or evading. Secondly, he can hurl an explosive canister that explodes mid-air, dodge at the sound of sword whip, or double dodging.
Roseblade:
Roseblade may seem daunting at first with his multiple phases and move sets, but he is actually straightforward once you understand how he works. You can read more about him in our Pain Cage Guide. A few things we would like to add here. The best way to deal with Roseblade is by going up close and personal because he has only two melee move sets, so anticipate them and dodge them during Phase 1.
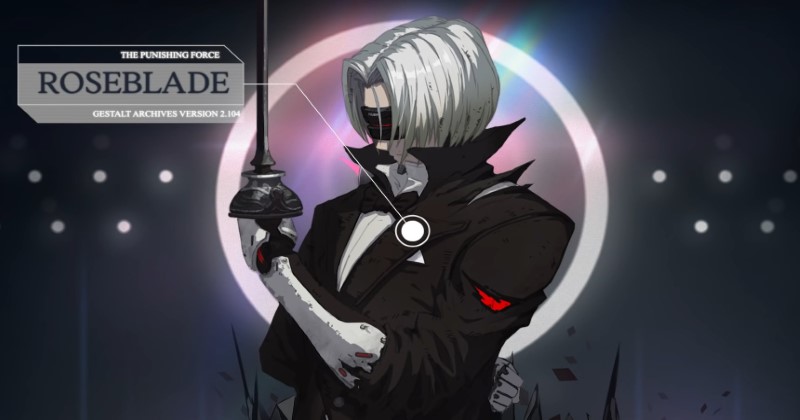
He'll go into Phase 2 when below 20 HP bars indicated by his weapon is on fire, due to which he can produce three eruptions on your predicted location and only done when not in melee range. You can counter this by getting close to him. This strategy can also send him to a tired state if he doesn’t do a 3-hit wide AoE combo.
His Phase 3 begins once he is in critical health and goes into a rage, but it's simple as having two ranged and two fixed melee combo chains. He'll always perform two sets of triple thrusts when you're up, closely followed by either of two finishers being unleashing sword waves from afar. The sword wave can sometimes be replaced by his lunge and attack move set. The second is fading away and reappearing from above your head, which is indicated by a glowing timer indicator just above your head, which can happen few times in a row. The basic gist of this fight is always to get close to him and away from his front.
Lamia:
We would rate this one of the most incredible fights in the game. Lamia is a Mecha shark with a spear for a weapon. She lunges from the sea onto the platform she fights with you on. While her melee jabs and swings are a pretty standard affair and easier to dodge, her airborne attacks are brutal. The first one is where she jumps in the air and throws an energy spear at you while you least expect. For the second, she jumps and vanishes, reappearing a little more than a moment later, and, with lighting speed, jabs her spear into the ground where you would have been if you hadn't dodged.

When she's near-critical health, she transforms into her natural form of a mermaid, but before transforming, Lamia calls in the tsunami by slamming the platform with her spear, and now you’re underwater, which gives her the mobility she needs in the mermaid form. She starts with dual blade swings and then back-to-back swings while moving like an actual shark. If you dodge well and damage her, you get your moment of opportunity to deal massive damage as she becomes tired and gets stunned for a while.
After her awareness returns, she transforms back to the mecha state, and the water clears. Then she climbs the tower in the middle of the platform and calls in the red lightning, and bombards you with energy spears one after the other until she teleports with an attack to return to the ground. The rest are the same attacks as before until you finally defeat her.
Royal Guard:
She is one of the most challenging bosses due to her being very tanky. Make sure when fighting this Boss is to dodge correctly. Her first move set is to jab with her weapon and move in the jab direction, which is telegraphed with a red rectangle. Her second ability is a slam of her weapon, erupting the ground in front and sends eruptions in that direction. The third attack is her swipe; all of these are easy to dodge if you time correctly. Sometimes she swipes 2 to 3 times.
Ronin IV:
This Boss can become one of the roadblocks in the game. You have to fight him when you're doing Memory Rescue missions, and you'll encounter him while looking for Shakespeare which has a level requirement of 70. His difficulty comes from the skill called Icy Path, in which he releases 1 Ice Pillar that tracks you, all the while the Ronin can keep on attacking you even when he goes stealth.
This Icy Path deals a lot of damage, so you need to be very wary in this stage, especially if you’re a melee main. To overcome that, either you need to lure him away from the Icy Path so you can deal damage in peace, or play this stage with a ranged Structure whenever possible. If you are successful, you can then dodge his melee attacks because his attacks have straightforward patterns.
Rosetta:
Rosetta is the final Boss in the Campaign mode, and after defeating her, you would have the surety that now you can beat every other Boss on a higher difficulty. She isn't a difficult Boss per se, but her timings of attacks after the telegraphs can become tricky. You may need to fight her more than once to learn her patterns. You can read more about her in our Pain Cage guide as she is one of the bosses that make their appearance in Pain Cage after hers in the campaign.
Eternal Engine:
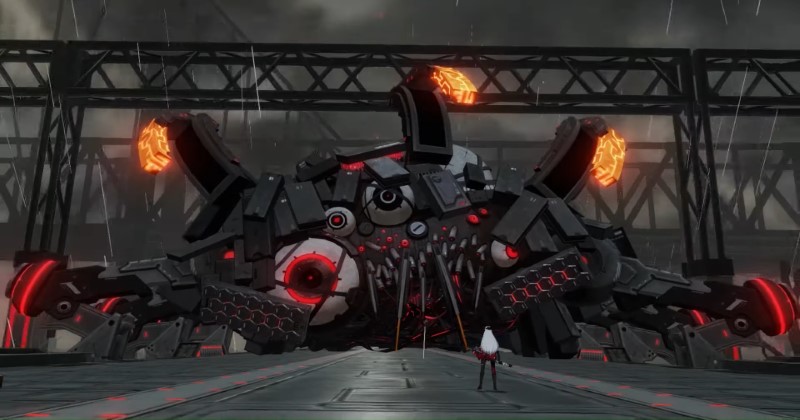
This behemoth of a Boss slams one of his metal tendons on the ground as soon as he is done screaming, which you need to damage a lot before it goes away all the while attacks coming from one or two of his eyes and keeps repeating it until you destroy one the tendons. Immediately after, he spews fire and begins anew with his 2nd tendon until you destroy all three of them; after that, the Engine either bombards the battleground three bombards at a time or summons bots to fight.
When you finish the summons, you need to stay behind a pillar as the Engine blasts a beam on you which you can counter only when one the pillar can reflect the beam. The reflected beam from the pillar deals massive damage to the Eternal Engine. This massive damage renders him almost stunned besides a few bombards. He dies soon from your attacks if you’re fast.
Conclusion:
These are some essential and unique bosses in the game that need preliminary information on how to fight them otherwise; they can become an annoying roadblock in your progression; therefore, we have explained the most important mechanics of fighting them.


What's New
SaGa Emerald Beyond Beginner Guide - Tips and Tricks with Best Gameplay Recommendations
Beat and Battle with Jujutsu Battles: Tokyo Saga Beginner's Guide with Tips
Protect the World with Best Abyssal Survivor Tips and Tricks - A Newbie Guide
Zak & Wowo Beginner Guide – Tips and Tricks for the Adventure
If you're intrigued by this game and eager to dive in, simply click the button below to start playing this game online right in your browser!