Whiteout Survival Beginner's Guide, Tips and Tricks
Step into the frozen world of Whiteout Survival, where every snowstorm tests your skills and every decision counts. This Whiteout Survival beginner’s guide is here to warm you up with the best tips and tricks to kickstart your journey. From keeping your people alive to building a strong base and gathering resources fast, we’ve got you covered.
Contents

Start Building Your City
Building is the core of Whiteout Survival. Every structure you place serves a specific purpose from keeping your people alive to boosting production and power. As you progress, your city will expand with new facilities, but in the beginning, the goal is simple. Build the essentials that keep your citizens warm, fed, and safe. Your first day in Whiteout Survival is all about setting up the foundation of your city. Here’s what to focus on right away.
The Furnace is Your Lifeline
Think of the Furnace as the absolute center of your city’s survival. It doesn’t just provide warmth, it literally keeps your citizens from turning into walking popsicles. If the Furnace goes out, people start freezing, their productivity tanks, and before you know it, your carefully built city looks like a snowglobe disaster.

Keeping it fueled is your top priority. Coal and other types are its food, and it consumes them constantly. Upgrading it makes it hotter and longer, which means you can support more citizens and build more advanced structures. A high level Furnace even boosts city growth, unlocks new buildings, and generally makes life a lot less miserable. In short, treat the Furnace like the VIP of your city. Give it attention, feed it regularly, and don’t ignore it.
Check on Your Citizens
Before you start building like crazy, make sure to check on your citizens first. These little guys are basically your city’s engine. Tap the little face icon, and you’ll see everything about them. Their health, mood, and what jobs they’re doing.

If they're warm and fed, they work like champs. If they are cold and starving? Productivity drops faster than your coal supply. So keep them comfortable, keep them busy, and they’ll keep your city growing instead of collapsing into an icy disaster.
Build the Essentials First
Whiteout Survival doesn’t give you room for mistakes, your people will freeze, starve, or complain non-stop if you build the wrong things first. So let’s start with the essentials that keep everyone warm, fed and not on the brink of a meltdown.

-
Shelters: Your people need a house to sleep that isn’t a snowbank.
-
Cookhouse: This is where all the delicious meals get made. Upgrade it early so your citizens stop crying about eating plain meat chunks.
-
Hunter’s Hut: Your food lifeline. The hunters basically work 24/7 so your city doesn’t turn into winter-themed hunger games.
-
Coal Mine: The real MVP. If this thing stops working, your Furnace shuts down. And then it’s Welcome to Popsicle Town. Keep this upgraded and running nonstop.
These basics are your foundation. Once they are built, your city stops feeling like a disaster camp and starts feeling like a tiny, functioning civilization.
Never Run Out of Coal
Your Furnace is basically a giant, hungry monster that eats coal 24/7. The moment you run low, everything goes downhill so fast. Your city gets cold. So keep that Coal Mine pumping like its life depends on it. Upgrade it, assign workers, check it often, and always keep a backup stash. In Whiteout Survival, coal isn’t just a resource, it’s your city’s life support.
Once your basic buildings are stable, you’ll unlock more advanced ones such as Hall of heroes, Lighthouse, Infirmary, Research center and Embassy . Your goal in the first 24 hours is simple. Keep the Furnace burning, your people healthy, and your resources balanced.
Focus on Research and the Embassy
If you’re looking for the best Whiteout Survival tips to speed up your progress, upgrading your Embassy and Research Center should be at the top of your priorities. These two buildings directly affect how fast you grow, train, and upgrade everything in your city.
-
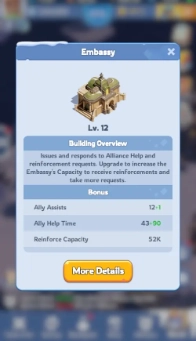
Upgrade the Embassy whenever possible: The Embassy allows your alliance members to assist you with construction and research. Each time your alliance helps, the time to complete upgrades is reduced. Always level up your Embassy alongside your Furnace so you can get more assists and cut down on waiting time.
-
Keep your Research Center upgraded: The Research Center is what drives long-term progress. It has three main tech trees: Growth, Economy, and Battle. Early in the game, focus entirely on the Growth tree, as it gives the most useful boosts for beginners.
Prioritize Construction Speed, Research Speed, Camp Expansion, and Trainer Tools first in the Growth tree. Skip the Battle and Economy trees at the start - they become important later but not in your early hours. Focus on Growth until you’ve maxed out your key speed and capacity upgrades. In short, one of the best Whiteout Survival tips for beginners is to upgrade your Embassy and Research Center whenever your Furnace levels up and keep your Growth research running at all times.
Training and Upgrading Your Troops
In Whiteout Survival, your troops play a huge role in gathering, defending, and fighting other players. So keeping them upgraded is a must. There are three main types of troops:
-
Infantry - Frontline units designed to absorb heavy damage.
-
Marksmen - Ranged fighters who deal high damage from a distance.
-
Lancers - Balanced unit that combines both offense and defense.

Each troop has its own training building. Upgrading these boosts your training speed, capacity, and unlocks higher-tier troops that are much stronger. Skip mass training of weak troops. They just fill your Infirmary faster. Focus on unlocking higher tiers. If you’re unsure which ones to prioritize, checking a Whiteout Survival tier list can help you see which troop types and tiers perform best as you progress.
Choosing the Right Heroes in Whiteout Survival
Heroes are the backbone of your progress in both city building and combat. Whether you’re leading expeditions, battling the arena, or developing your city, picking the right heroes early can make everything smoother. Consider your heroes as the VIPs of your city. Here’s a selection of early heroes you should prioritize.

-
Zinman - The construction wizard. He basically gives your hammer arm superpowers.
-
Jasser - Research guru extraordinaire. If you want to unlock new tech without pulling all-nighters, Jasser is the way to go.
-
Bahiti - Reliable frontline infantry hero. Strong, dependable and won’t complain when facing a horde of frostbitten enemies.
-
Sergy - Another solid tank for early fights. He’s the guy who stands in the snowstorm so your units don’t have to.
-
Jerenimo & Natalia - VIP heroes with long term value. They might take a little extra effort to get but, trust me, they’re worth it.
You can upgrade heroes by raising their level, increasing their star (snowflake) rank, and improving their skills. Each upgrade boosts stats and may unlock new abilities. As they level up, heroes can also lead more escorts, meaning a larger troop count in battles.
|
Skill |
Details |
|
Exploration Skills |
Work in story missions and Arena battles. |
|
Expedition Skills |
These apply when heroes lead troops out in the wilderness. |
Tip: Focus on heroes that boost your city’s progress, then shift to stronger combat heroes as your army and Arena activity grow.
Whiteout Survival Guide: Alliance Basics and Ranks Explained
Alliances are everything in the Whiteout Survival gameplay. Joining one early makes your journey way easier-you'll get faster building and research times, help from other players, and access to shared rewards.

Once your base is looking a bit more built up, it’s time to join or start an alliance. This is where the fun really begins. Alliance members help speed up your construction, research and healing, contribute to tech boosts and give you access to Alliance Territory for extra resources and stats.
Creating or Joining an Alliance
If your Furnace level is under 10, creating an alliance costs 400 gems. Above level 18, it’s free. But before you start your own, know that running an alliance takes effort and constant activity. You’ll be competing against stronger, well established groups. So it’s often smarter to join a top-tier alliance first to learn how everything works.

Top 10 alliances often form non-aggression pacts (NAPs) to avoid attacking each other and focus on growth, so getting into one of these is a huge advantage.
What is r1, r2, r3, r4, r5, in Whiteout Survival?
Every alliance has ranks that define what members can do. These ranks range from R1(new member) to R5(leader) and each step comes with more responsibility and authority. Here’s a quick breakdown:
-
R1 - The entry level rank for new players. Members can participate in chat, contribute to technology research, and view other profiles. This rank provides a foundation for basic alliance involvement.
-
R2 - Same as R1, R2 members can message all alliance members. This rank denotes a slightly higher level of trust and engagement within the alliance.
-
R3 - Officer: This is a big step up. R3s can promote or demote R1 and R2 members, helping manage activity and structure.
-
R4 - Senior Officer: Handles kicks, promotions, and tech management. R4s can also modify alliance settings, post bulletins, and manage recruitment.
-
R5 - Alliance Leader: The boss. R5 can rename, transfer leadership, build HQs, or even disband the alliance. They control everything from diplomacy to structure.
Alliance Tech and Donations
Head to the tech Contribution tab in the Alliance Menu to donate coal, wood, meat, iron, or gems for Alliance Tokens. Tech is split into three parts, Growth, Territory
-
Growth: boosts building and research.
-
Territory: improves control and gathering.
-
Battle: upgrades combat strength.

Only R4 and R5 can start research, but everyone should contribute-especially to tech marked with the green “OK” icon for +20% bonus rewards.
Alliance Shop and Rewards
Spend your tokens in the Alliance shop for big discounts. You can buy Speedups, hero shards, shields, rename cards, and teleporters. Stay active and donate often to keep earning more tokens.
Alliance Help and Chests
Use the help feature (the shaking hands icon) to speed up your allies’ build or research timers. They’ll do the same for you.
When members defeat Polar Terrors or Cyptids, everyone gets Alliance Chests filled with loot. Open them to fill your Honor bar and unlock even bigger team rewards.

People Also Ask
What is the Best Lineup in Whiteout Survival?
Your best lineup in Whiteout Survival really depends on your budget and hero generation. For F2P players, a solid setup is heroes like Natalia, Molly, and Flint, with Gina for support. If you’ve got more resources, go for Gen 2 or 3 heroes such as Flint, Mia and Alonso for a stronger balance of defense and offense. A good formation usually has two Infantry up front to tank damage, lancers on the side for attacks , and marksmen in the back for ranged support.
How to Be the Best in Whiteout Survival?
To be the best in Whiteout Survival, focus on upgrading your heroes, joining a strong alliance, and staying active in events. Manage your resources wisely, level up your shelter and troops, and build a balanced lineup for both offense and defense. Consistency is key: log in daily, complete missions, and work with your alliance to rise to the top.
How Do I Build My Shelter Efficiently?
To build your shelter efficiently in Whiteout Survival, always focus on upgrading your key facilities first like the Furnace, Barracks, and Research Center since they boost power and unlock new features. Keep your builders busy at all times, gather resources constantly, and use speed-ups wisely during events to maximize rewards.

Multi-instance + Sync: Create multiple instance and execute the same operation simultaneously, upgrade your kingdom quickly
Ultra-Wide Screen: Get a full view of the battlefield and seize the strategic opportunities.
Keyboard Mapping: Constructe buildings, place combat units and release skills more convenient and accurately
Landscape: Widen vertical screen by landscape, with a wider field of view and smoother operation for SLG games.
Conclusion
Progressing in Whiteout Survival is all about smart building, joining an active alliance, and contributing regularly to earn bonuses and rewards. So, it is time to use our tips to survive better. Stay active, donate to alliance tech, and help teammates to speed up everyone’s growth together. And before you log off, don’t forget to check for the latest Whiteout Survival codes. They often include free resources, speedups, and hero shards that make surviving the frozen world a lot easier.
More from Whiteout Survival
-
Whiteout Survival: The Tundra Arms League Event Guide, Rewards and More
-
Whiteout Survival Gen 10 Heroes Guide - Freya, Blanchette and Gregory
-
Whiteout Survival Gen 9 Heroes Tier List – A Full Walkthrough Guide
-
Whiteout Survival Mithril Guide - How To Obtain & Use Mithril Efficiently
-
Whiteout Survival - Best Survival Lineups For Newbies & Meta Players

For the past 4 years, I’ve been writing guides for action, strategy, and adventure games. As I am a 24 year old student in the field of animation, I have a huge passion analyzing gameplay with computer animation and game design tools, finding clever ways to help players improve. Gaming fuels my creativity, and writing is my way of sharing tips, tricks, and enthusiasm with others

Whiteout Survival